Judul : Just Another Sock Monkey Hat Pattern
link : Just Another Sock Monkey Hat Pattern
Just Another Sock Monkey Hat Pattern

I wanted to post within a week that I have had a happy life and have a lot of fun doing. But I have something ... my life is very boring. I have nothing to blog about. I'm on Twitter and all I can say is hate. I really want life, I think
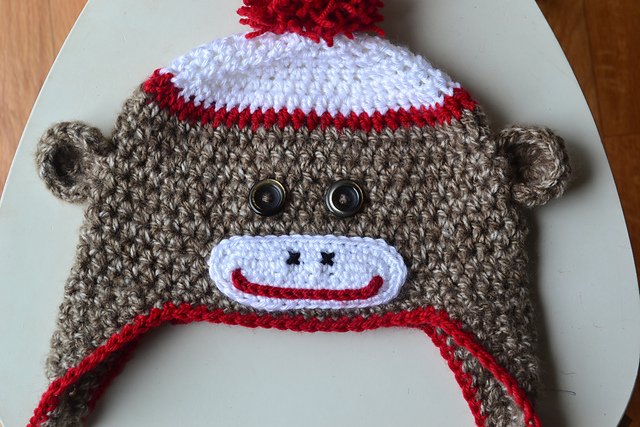
With that in mind, I decided to wear a sock monkey hat. I used other styles to make these hats and they all turned out well. But this time I decided to make this hat new. I love my shortcuts and my routines.

Materials
Giant Thread 1 Leather (I used the Gifi Lion Brand in camel spray)
Red, white and some black threads
Crochet hook measures H and I.
Needle thread
2 buttons
To measure
Image size suitable for 4-12 years old.
This template is easy to customize to fit any size.
I used a lot of weight. If you want to lose weight, you can get a baby hat or hat.
I forgot to take the pressure gauge before posting, but waited for a while. If they fit loosely, the hat would be ideal for adults.
example
I love and white, Ch3
Connect Rnd 1: 7 hdc (this is done on the 1st vs) g from the first tip to the 3rd vs. (8 HDC)
Row 2 ፡ die Ch 2 (here and everywhere counts as the first m). CDU alike. 2 pskn in each circle. Join SL St. (16 HDC)
Rnd 3 ፡ emer Ch 2. HDC In the same street, HDD in the next street. (2 psn m next, psn m next) In a circle. Join SL St. (24 HDC)
Row 4: 2 squares, in the same st, sc in the next 2 sts (2 squares in the next loop, sc in the next 2 loops) in a circle. Join SL St. (32 HDC)
Row 5: ch 2, sc in the same sts, sc in the next 3 sts. (2 m2 in the following sts, sc in the next 3 sts) In a circle. Joint. (40 xds)
Row 6: 2 vs, sc in the same sts, sc in the next 4 sts (next 2 q, sc in the next 4 sts).
Joint. (48 HDC)
Row 7: 2 m2, in the same sts, sc in the next 5 sts in the circle (2 but the next stool, but in the next 5th place). Joint. End. (56 °)
Row 8: Use red, connect sl st and 2 dc PSN in next round and around each loop. End.
Connect and follow gs using the camel from 9th row 2. PSN around the next round and each loop. Join SL St.
Views 10-17: 2 vs, add every mb, mb to hdc. Don't hit.
Ushaanka
1 square, square in the same round and in the following 10 stickers (11 cm.
1 square, 2 sc together, over the next 9 sc, fold (10 cm)
1 m2, 2 sc together, subsequent sc 8 m, turn (9 cm)
Repeat this reduction process until you are done with the cycle.
2nd cover
Leave the cap to the right, remove the flap you just created 17 stitches from the first row.
Connect SS and ch 1. Switch to mb and the next 10 m in the same thread. (11 kg)
Make this closure the same way as the first one, but don't finish when you finish the last row.
You put a sweater over your hat. Distribute 11 squares on each side of the ear canal and 3 squares on each corner. End.
Attach it with red thread at any angle, leaving the tail long enough to be used as part of a sweater. Mark the lines ks on the hat. Make sure you place 3 skis in each corner. Finish the tail, leaving enough length to serve as a snatch. (I like the way the knitting needles are removed)
Face
F14
1st free row sc from hook to next 2, sc to next 11, 3 sc to next. Work on the other side of the chain, the next 11 cm. Don't join the latest hf 2sc.
2nd row: first 2 sq m, next 11 m, 2 sc every next 3 m. RLS in the next 12 tbsp. 2 squares next st, attach.
3rd f. 2 sc before st, sc for the next 14 sts. 2 stbn in the next 3 stbn, stbn in the next 14 soups. 2 sq m next m, last mb m.
Using my favorite custom braid, leave the ponytail long for sewing. (Read the big hat tutorial to finish)
Minerals
Change the hook to H and add 2 strands of camel spray. Strong sweater
F3
Row 1 ፡ 7 hook, turn from sc sc to sc. (8 HDC)
2nd free row 2 sq.m. (16 HDC)
Finish with a tail that is long enough to sew.

braiding
Cut nine threads on each side. You must already have 1 thread (beginning and end) for one side.

Make an apple pie and sew the top of the hat.
Use the photos as a reference, adjust the eye and the visor. Only sew the top of the hat to make the back nice and neat when sewing.

Use red and draw a smile on your face. I played with it for a while to see if I liked it. I did it after putting everything in place. I put each end of the tail under a camel's hat. (If you don't like this method, you can always tie a smile with a metal needle.

As always, you can leave a comment or send me a message if you need help. I don't hope, but let me know. I check the messages several times a day.
to have fun!
Demikianlah Artikel Just Another Sock Monkey Hat Pattern
Sekianlah artikel Just Another Sock Monkey Hat Pattern kali ini, mudah-mudahan bisa memberi manfaat untuk anda semua. baiklah, sampai jumpa di postingan artikel lainnya.
Anda sekarang membaca artikel Just Another Sock Monkey Hat Pattern dengan alamat link https://crochet-info97.blogspot.com/2022/05/just-another-sock-monkey-hat-pattern_10.html


0 Response to "Just Another Sock Monkey Hat Pattern"
Post a Comment