Judul : Just Another Sock Monkey Hat Pattern
link : Just Another Sock Monkey Hat Pattern
Just Another Sock Monkey Hat Pattern

I want to post all week about how interesting my life is and all the interesting things I do that have nothing to do with antipathy. But I understand one thing... my life is pretty boring. I don't have many blogs about it. I'm on Twitter talking about hate. I need a life I guess :D
With that in mind I decided on my Sock Monkey Hat model. I have used other models to make this hat and they all look great. However, this time I decided to make this hat with a whole new model. I love my shortcuts and the way I do things.

ingredients
1 heavyweight thread (I used Jiffy Lion Brand thread in Camel Spray)
Some red, white and black threads
H and I size needles.
thread the needle
2 buttons
Measure
The size of the picture is suitable for children between 4 and 12 years old
This model is easily adjustable to any size
I use a lot of weight. If you choose wool, you will end up with a baby or toddler hat
I forgot to get the mat before shipping it but I bruised it a little. If you do it with a wider stitch, the hat is suitable for adults.
template
With my hook and white, chapter 3
Round 1: 7 tr From the 3rd chain stitch from hook (this is the first cat made) tie tr in first st. (8hdc)
Round 2: K2 (counts as first st here and during). HDC stays the same. 2 ch each. Enter sl. (16 hdc)
ROW 3: K 2 mm the same st, hm next st. (2 dc in next g, but in next g) approx. Enter sl. (24HDC).
Round 4: 2 pts but same pt but next 2 pts (2 tr next incline but next 2 tr) approx. Enter sl. (32cc).
Round 5: 2 pts, but same pt, but next 3 pts (2 next but one 3) approx. Consolidated. (40cc).
Round 6: 2 rounds, same point, next 4 rounds. (2 tr next incline but next 4 tr) approx.
Consolidated. (48cc).
7th round: 2 tx, mm pt equal, mm 5 pt. (2nd next pitch but next 5th) approx. Consolidated. ready. (56°).
Round 8: Use red with the attack sc and continue with the 2nd pair, with the next pair and about once. ready.
Round 9: Use camel, attack with sc and follow 2nd sc on next st in and around all sts. Enter sl.
10-17 rounds: 2 ch around each point, add sc. Don't spend.
ear protection
1 ch, sc pt same and next 10 stetan, turn (11 sc)
1 ch, 2 sc, sc next 9 stetan, turn (10 sc)
1 ch, 2 sc, sc next 8 stetan, turn (9 sc)
Repeat this shrinking method until you're done with one point.
second earplugs
Turn the cap on the right side and jump 17 sts from the 1st row of newly made earrings.
Beg with the same sc and p and turn the next 10 sts. (11 seconds).
Work on these earrings first, but don't waste it finishing the last round.
You will practice the Ks all over your hat. Place 11 dc evenly on the side of each protective ear and 3 dc on each corner. ready.
Tie it to any corner with red thread, leaving the tail long enough to be used as part of the braid. Practice a GS row around the canopy. Remember to put 3 sc in each corner. Finally, leave a ponytail long enough to be used as part of the braid. (I like the way the story ends)
mouth
Chapter 14
1st round: sc amutik 2nd sc, next sc 11 sc, 3 sc last sc. Work on the other side of the chain, sc next 11 sc. 2 seconds in the last chapter. Don't sign in.
Round 2: 2 BP in first st, sc in next 11 st, 2 BP in next 3 minutes. sc in the next 12 stetan. 2 sc in next st, do not connect.
Round 3: 2 p. in the first, pb in the next 14 p. 2 sc in the next 3 st, sc in the next 14 p. 2 sc in the next st, sc in the last st.
Let the tail sew long enough with my favorite custom finish. (See Heavy Hat Tutorial for complete)
End
Switch H with a hook and hold 2 camel spray branches together. Sare estu
Chapter 3
Row 1: 7 sc from 3am, turn. (8hdc)
Row 2: 2 htr, htr in first pair, 2 htr per meter. (16 hdc)
Ready to leave the tail long enough for sewing

weave
Cut nine threads on each side. You should already have 1 thread (beginning and end of the tail) on one side

Make a pom pom pom and sew it onto the hat.
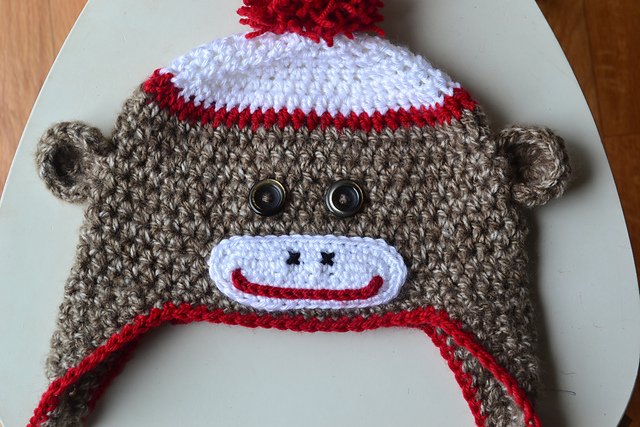
Using the photo as a template, sew your eyes and mouth onto the hat. When sewing, only work from the top layer of the hat so the back is nice and tidy.

Use a red smile, narrow mouth. I played a few times to get it the way I wanted it. I did everything after stitching it in place. I put on all parts of the bottom tail of the camel hat. (If you don't like it, you can always sew a smile with a metal needle. The pictures of Ireland with a hat have such a smile.

As always, leave me a comment or message me if you need any help. It could have been a mistake that I wrote so quickly. I hope not but tell me. I check my messages several times a day.
Have a good time!
Demikianlah Artikel Just Another Sock Monkey Hat Pattern
Sekianlah artikel Just Another Sock Monkey Hat Pattern kali ini, mudah-mudahan bisa memberi manfaat untuk anda semua. baiklah, sampai jumpa di postingan artikel lainnya.
Anda sekarang membaca artikel Just Another Sock Monkey Hat Pattern dengan alamat link https://crochet-info97.blogspot.com/2022/05/just-another-sock-monkey-hat-pattern_17.html


0 Response to "Just Another Sock Monkey Hat Pattern"
Post a Comment